Focaccia Bread..EASY PEASY! Is it food? Is it art?

This post is dedicated to George Morris, who recently celebrated his 90th birthday. A man of great talent, wisdom, and character, George has been a true inspiration to all who know him. His quiet strength and generosity have made a lasting impact, and his life is a testament to the value of kindness, integrity, and dedication. It’s an honor to celebrate him in this small way.

Don’t let the name intimate you. ‘Focaccia’ bread is the easiest and tastiest bread on the planet. When you have freshly baked focaccia with pasta, chili or make a sandwich ..life is good! YUM! You can make it right in your own home! Don’t forget I said EASY!

This is the best video I found on making focaccia bread, and could not say it better. In my mind, the overnight proofing is very important. And, it breaks up the work time – another bonus. The first time making focaccia may be daunting. Make it again and again. Forget those store bought breads.

INGREDIENTS

  • 4 cups (512 g) all-purpose flour or bread flour
  • 2 teaspoons (10 g) kosher salt
  • 2 teaspoons (8 g) instant yeast
  • 2 cups (455 g) lukewarm water: Hint: combine 1/2 cup boiling water with 1 1/2 cups cold water
  • butter for greasing
  • 4 tablespoons olive oil, divided
  • flaky sea salt, such as Maldon or kosher salt
  • 1 to 2 teaspoons whole rosemary leaves, optional 

INSTRUCTIONS

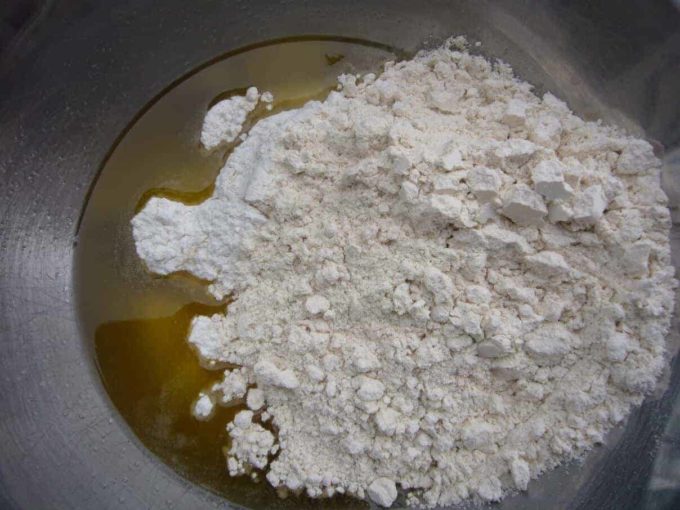
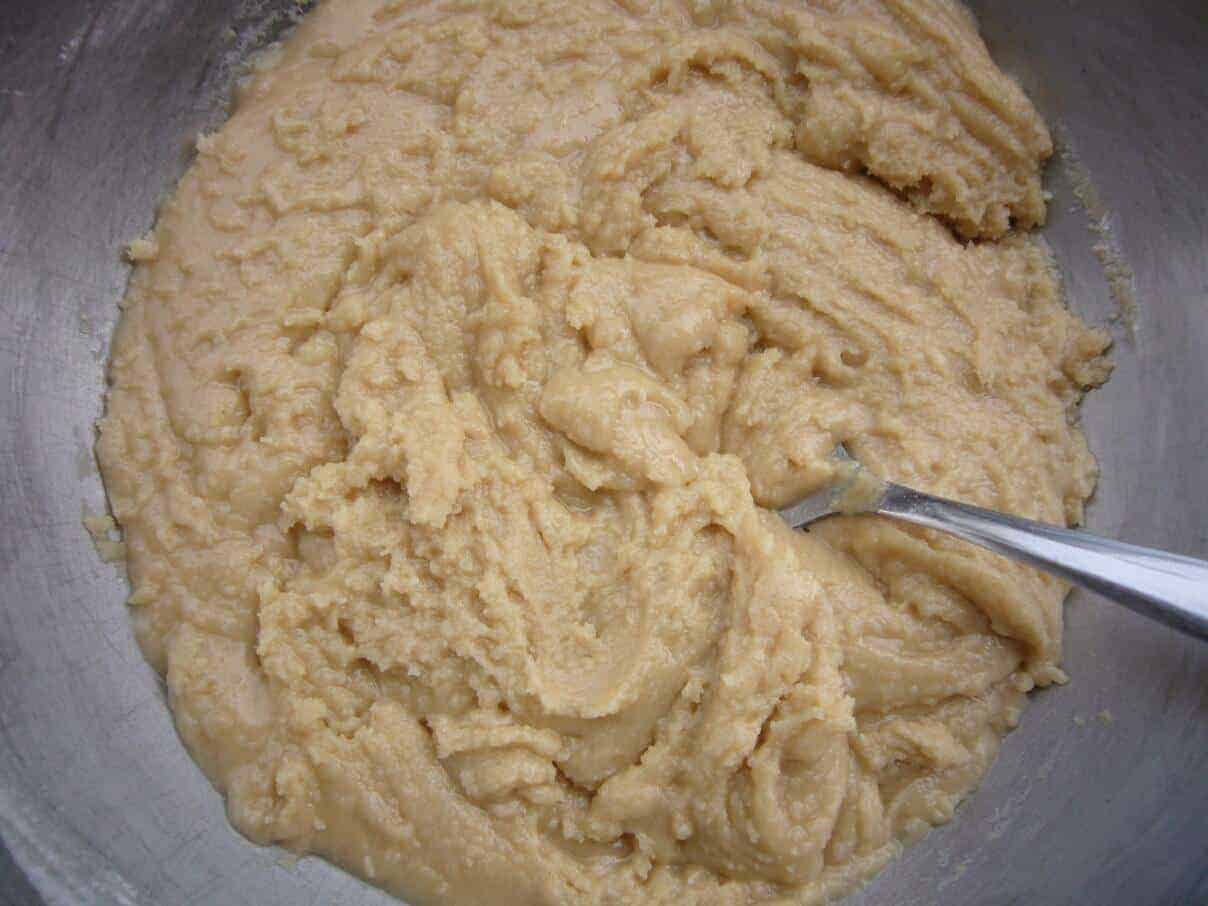
  1. Make the dough: In a large bowl, whisk together the flour, salt, and instant yeast. Add the water. Using a rubber spatula, mix until the liquid is absorbed and the ingredients form a sticky dough ball. Rub the surface of the dough lightly with olive oil. Cover the bowl with a damp tea towel, cloth bowl cover, or plastic wrap and place in the refrigerator immediately overnight. NOTE: It is important the dough really be slicked with olive oil especially if you are using a cloth bowl cover or tea towel as opposed to plastic wrap or a hard lid.If you are using a tea towel, consider securing it with a rubber band to make a more airtight cover.If you do not slick the dough with enough oil, you risk the dough drying out and forming a crust over the top layer. 
  2. ·  Line two 8- or 9-inch pie plates or a 9×13-inch pan ( high sides) with parchment paper or grease with butter or coat with nonstick cooking spray. Glass baking dishes, butter is a must.
  3. ·  Pour a tablespoon of oil into the center of each pan or 2 tablespoons of oil if using the 9×13-inch pan. Using two forks, deflate the dough by releasing it from the sides of the bowl and pulling it toward the center. Rotate the bowl in quarter turns as you deflate, turning the mass into a rough ball. Use the forks to split the dough into two equal pieces (or do not split if using the 9×13-inch pan). Place one piece into one of the prepared pans. Roll the dough ball in the oil to coat it all over, forming a rough ball. Repeat with the remaining piece. Let the dough balls rest for 3 to 4 hours.
  4. · preheat oven to 425°F. If using the rosemary, sprinkle it over the dough. Pour a tablespoon of oil over each round of dough (or two tablespoons if using a 9×13-inch pan).  Rub your hands lightly in the oil to coat, then, using all of your fingers, press straight down to create deep dimples. If necessary, gently stretch the dough as you dimple to allow the dough to fill the pan. Sprinkle with flaky sea salt/ kosher salt.
  5. Bake for 25 to 30 minutes, until the underside is golden and crisp. Remove the pan(s) from the oven and transfer the focaccia to a cooling rack. Let it cool for 10 minutes before cutting. Note: each oven temperature is different. Judge the cook time, if you are making it for the first time.

Coeur a la Creme

—Make like PEPI LE PEU, and whip a bit of romance into your life. You can add fresh berries or a sauce.

Coeur ❤️ a la Creme (heart of cream) Recipe

Valentines Recipe

  • Servings: 6
  • Difficulty: easy
  • Print

INGREDIENTS
6 oz. fresh goat cheese
4 oz. cream cheese, softened
1⁄3 cup honey
3⁄4 cup heavy cream
1 tbsp. confectioners’ sugar

INSTRUCTIONS
STEP 1
Make the coeur a la creme: Soak two 12″ x 12″ pieces of cheesecloth in cold water and squeeze dry. Put a 7″ heart-shaped coeur a la creme perforated mold on a fine-mesh sieve over a bowl; line mold or sieve with the cheesecloth, allowing the corners to drape over the side. Set aside.
STEP 2
With a whisk or hand-held mixer, whisk together the goat cheese, cream cheese, and honey until very smooth. In another bowl, whisk together the cream and confectioners’ sugar until soft peaks form. Gently fold the cream into the cheese mixture until evenly combined. Spoon the mixture into the prepared mold or sieve and fold the corners of cheesecloth over the top. Allow the mixture to drain for at least 2 hours, or overnight in the refrigerator

Buy Couer a la Creme bowls on Amazon for about $7.95. The original recipe calls for cream cheese. The goat cheese was a very nice combination. Pair with cake, biscuits or dry toast.👍

3 Stages to shape and drain water from the dish. ~ BlackBerry/Grand Marnier Sauce [used a 6 inch kitchen sieve with 2 layers of cheese cloth. It worked perfectly fine. ]

SERVING SUGGESTIONS

THE CLASSICS

For newby foods connoisseur, this recipe was developed in the French countryside during the Middle Ages.

This recipe is the ORIGINAL FRENCH Version. I appreciate the classics. Myself, I omit all sugar and it tastes great. A bit like creme fraiche. Fruit on its own is sweet. ‘Fructose’ is a natural sugar in fruit. The cream is sweet on its own. After making this dish by omitting all added sweetness and it is not to your liking, then drizzle honey on top. A perfect save.

Honey, savory chutney and smaller sized portions.
One with fruit already in the cheese mixture.

Healthy THAI Chicken Soup 🔥

It’s New Years Day 🔔. Today it’s “heat and serve” day!

Thai soup with chicken is packed with flavor thanks to the combination of curry paste, coconut milk, fresh ginger, and lime 🍋‍🟩 [I made it in advance] There are many version of chicken soup 🍲🥣. This is my favorite. It has so much flavour and a light soup. Very satisfied feeling. You don’t feel stuffed.

LESS STRESS ~ USE A PRESSURE COOKER* One Pot Cooking

Thai Chicken Soup RECIPE

Recipe

  • Servings: 6
  • Difficulty: easy
  • Print

INGREDIENTS

▢ 2 Tablespoons cooking oil, such as vegetable or canola oil
▢ 1/2 cup onion, finely chopped
▢ 1 medium red bell pepper*, cored and seeded then sliced into thin 2-inch strips
▢ 8 oz mushrooms, white or cremini recommended
▢ 4 cups chicken broth
▢ 6 oz chicken breast, diced or cut into bite-sized pieces (or chicken thighs)
▢ 2 teaspoons fish sauce
▢ 1 teaspoon Worcestershire sauce
▢ 1 teaspoon lemongrass paste, or 1-2 stalks lemongrass, optional
▢ 1 can coconut milk
▢ 2 tablespoons red curry paste
▢ 1 teaspoon Sambal Oelek chili paste, or Asian Garlic Chili Paste/Sriracha
▢ 1 Tablespoon cornstarch
▢ Cilantro, parsley, basil
▢ Lime juice

INSTRUCTIONS

1. Make this soup as you like! If you love bold flavours, go ahead and add more of the lemongrass, curry paste and Sambal etc., to your taste preference.
If you don’t want any heat, simply omit the Sambal altogether. Don’t forget to taste and add salt at the end of cooking, as needed, to really bring out all the great flavours.
2. Start the rice cooking. *You can cook the rice ahead and refrigerate or you can use left-over cooked rice.
3. Heat a large soup pot or Dutch oven over medium heat. Add 1 Tbsp. oil. When hot, add mushrooms and cook until golden and tender. Remove to a plate. In the same pot, add another 1 Tbsp. oil and heat. Add the chicken and cook, stirring, until no longer pink. Remove chicken to the plate with the mushrooms. Add a splash more oil, if needed. Add the onion and red pepper* and cook, stirring, just until softened. Return the mushrooms and chicken to the pot. Add the broth and heat through. Add the fish sauce, Worcestershire sauce and lemongrass paste (if using) and simmer 5 minutes. Add coconut milk, turn heat to low, then cover and simmer 2 minutes.
4. In a small bowl, combine curry paste, Sambal Oelek and cornstarch and mix until incorporated. Stir into soup until combined and heat until soup simmers, thickens slightly and has a velvety appearance. Taste the soup and season with salt and pepper, as needed.
5. To serve, spoon some hot rice into a bowl, then spoon hot soup over-top. Serve immediately garnished with cilantro, parsley and/or basil leaves and lime wedges to add a drizzle of fresh lime juice to the soup.
6. Store any leftover rice and soup separately, as the rice will soak up all the soup broth if store together
NOTE: Serve the soup with a tablespoon of cream, sour cream, or high fat yogurt.

Assemble all the ingredients in one pot. Give your taste buds a performance!

* a pressure cooker the heat is distributed evenly. Takes 10 minutes for most soups and tastes like it was simmering all day. [not like a slow cooker, where the bottom gets heated and heat slowly rises and longer cooking time.]

*Dr.Gundry recommends using a pressure cooker for your soup and many other dishes. Nutrients are preserved in a pressure cooker and it’s convenient. Reduces cook time.

  • Add*red pepper whole and remove the skin with your hand then chop or separate the pepper into bite sized pieces. Otherwise the skin floats in the soup and you get strands of skin in your spoonful. You can roast the pepper on a gas stove or oven roast to remove the skin.

Maamoul Cookies ~Naturally Sweetened 🎄Christmas 🎄Treat !

Looking for a sweet treat? When I found this buttery date filled middle eastern cookie I was inspired. Naturally sweetened with dates, which is a nutritional mammoth! Rosewater (DIY) 🌹added to this cookie is sensational! I was excited the first time I used the cookie mold. A beautiful presentation.

Date Filled Cookies

  • Servings: 12
  • Difficulty: easy
  • Print

 Ingredients 
▢ ½ cup ghee or butter (grass fed) 
▢ ¼ cup light olive oil or butter/ghee
▢ 2 ½ cups all purpose flour (may use half whole wheat pastry flour)
▢ 2 tablespoons sugar (monk fruit or sugar substitutes of your choice)
▢ 2 tablespoons rose water *easy DIY recipe below
▢ 3 tablespoons milk (start with 2 and add as needed)
▢ DATE FILLING
▢ ⅔ lb dates medjool, soft, pitted, chopped (or ready made date paste)
▢ For the "DUSTING" (optional)
▢ ->Confectioners sugar, almond flour or a mix of both.
Instructions
1. First, preheat the oven to 177°C/350°F. 
2. Melt the butter or ghee. Add oil and then mix in the sugar. In a large mixing bowl, combine the ghee/sugar mixture with flour, working them together with your fingers.Tip: Use odorless oil or only butter or ghee. Add as much flour as the butter/oil mixture will absorb and that usually varies from 2 ¼ to 2 ½ cups 
3. Add the rose water and mix it in. Next add the milk, one tablespoon at a time. Then knead it all into a pliable dough. 
4. When you add the milk, sometimes it might look like there is too much milk and the dough is sticky. But when you keep mixing it in, the milk gets absorbed. 
5. Let the dough rest for 30 minutes. Then roll out 32 portions of the dough into smooth balls. I find this easier because all my cookies more or less turn out the same size.
DATE FILLING
6 Process the chopped medjool dates in a food processor into a smooth mass. Use soft medjool date. If the dates are too dry -add water a tbsp at a time.
7 Divide the date mass into 32 portions and roll them into smooth balls. Use oil or safe food prep gloves if needed, as the dates can be sticky.
SHAPING THE DATE FILLED COOKIES
8 Take a dough ball and flatten it. Hold it in the center of your palm and cup it. Place a date ball in the center. Bring the edges of the dough together. Pinch the dough to seal well and then flatten it out. Press it into a disc.Tip: Make sure to not use too much filling, or the cookies will crack.
9 Bake for 15-20 minutes


Steps

The mineral content of DATES contributes to bone health. Dates, rich in polyphenols has anti-atherogenic, antioxidant and anti-inflammatory properties. The fiber in dates helps keep you regular and relieves constipation.

CELEBRATE! Holidays, Anniversaries, Graduation Day, All Special Events: Dust with Almond Flour (instead of sugar)

Maamoul Molds

Using a traditional Maamoul mold (<-click to buy)

  • MAAMOUL MOLD Instructions: A portion of the dough is first pressed into the mold. Then the date filling is layered on top of the dough.
  • Next, another portion of the dough is layered over the date filling and smoothed out.
  • Tap the front edge of the mold on a hard surface like a kitchen counter, and hold your palm under the mold to get the cookie that is released from the mold.
  • Well baked cookies will appear dry on the surface unlike the moist look of raw dough. Also, they will have a light tan. Dry cookie dough will crack during baking.
  • Chocolate fillings are popular. Gingerbread or almond cookies filled with pistachio, (pecans is my favorite). Fruit fillings: apricots, peach, cherries, apples and more. Add spices: cardamon, ginger or chia seeds. The combinations are endless.

Rose Water ~ DIY 🌹

Rose water 🌹 is a fragrant liquid made by steam distilling rose petals. It is commonly used in cooking and skincare due to its pleasant aroma and various benefits. Here is a simple DIY recipe to make rose water at home:

NOTE: For this recipe use 2 little dried rose buds (for rose tea) seeped in 2 tbsp hot water and cooled.

🌹 INGREDIENTS: 🌹

  • 2 cups rose petals (pesticide-free)
  • 3 cups distilled water

🌹 INSTRUCTIONS: 🌹

  • In a saucepan, combine rose petals and water and bring to a boil.
  • Reduce the temperature to simmer.
  • Simmer until the color of the rose petals has faded. 5-10 minutes.
  • Pour the water and petals through a cheesecloth (using a funnel) into a dark bottle.

VARIATIONS: You can use homemade rose water in desserts, beverages, or a facial toner. It adds a lovely floral aroma and a delicate touch to any recipe or skincare routine. My grandmother used it all the time as a toner.

Can I Freeze Maamoul Cookies?

YES -> freezer safe containers or freezer bags.

Before serving, thaw the cookies and a lightly warm oven for fresh tasting cookies. Otherwise, store in a tight container.

Date Filled Maamoul

Pickled Carrots and DUQQA (dukkah)

EGYPTIAN Duqqa ~DUKKAH

SPICE OF LIFE! Sesame seeds found on bagels and hamburger buns are now enhanced or “stepped up a notch” with this century old mixture called Duqqa adds protein, rich nuts and spices to make your taste buds sing. 🎵

There are as many recipes for DUKKAH as there are Egyptian cooks. I like the protein from nuts and seeds. Tonight, having rainbow trout that I will dredge in DUKKAH. Sesame seeds are a must. Mix hazel nuts, walnuts, pistachio nuts, and/or pine nuts with the classic almonds.

Egyptian Dukkah Recipe

  • Servings: A Topping
  • Difficulty: easy
  • Print

INGREDIENTS

▢ Nuts: 3-4 tbsp each Hazelnuts, almonds and pistachios 
▢ Spices:
▢ 4 tbsp (1/4 cup)Sesame Seeds
▢ 1 tbsp Fennel Seeds
▢ 1 tsp cumin seeds (or powder)
▢ 1 tsp coriander
▢ 1 tsp red pepper flakes (optional)
▢ 1/2 tsp. kosher salt (I use Celtic Salt)

INSTRUCTIONS
Toast/roast the nuts in the oven at 350F. Toast the sesame seeds in the oven in a separate small baking sheet. Watch for doneness!!
Dukkah depends on the freshness of the ingredients. Typically the spices are used whole, then crushed.
Combine the nuts, seeds and spices in a bowl. Crush and blend with the classic mortar and petal, or a food processor.
Pulse the processor until the nuts are well crushed. Do not over process to a powder form.

ROASTING NUTS AND SEEDS

Attempted to toast in a dry skillet on the stove top ends up with a burnt exterior and completely raw, untoasted interior. I have burned my share. Using the oven to toast your nuts is ideal because an oven provides uniform, even heat, which means that the nuts are going to be toasted from the inside out.

ROASTING TIPS🔥

Preheat oven to 350ºF. Line a baking sheet with parchment paper. Oven must be at a low temperature. Use an air fryer for convenience and speed. Cook the nuts only until they start to turn golden (a light brown) with parts still appearing raw. Your nose also tells you when they are done too.

Is Dukkah The Same As Za’atar?

I get asked this question a lot. The answer is: no. While Dukkah and Za’atar are two Middle Eastern blends that can be used similarly, they are clearly not the same in texture or flavor profile. DUKKAH is crunchy and granular. Za’atar , a finer blend, is a mixture of toasted wild thyme and sesame seeds along with sumac.

Pickling Instructions 🥕🥕🥕

Pickled Carrot Presentation

  • Servings: 2-3
  • Difficulty: easy
  • Print

INGREDIENTS

▢ 2 cups of pickled carrots (add zucchini + cucumber -optional)
▢ 1/4 cup fresh mint leaves (or basil)
▢ ½ cup of home made yogurt (see recipe) ~you decide how much per person)

INSTRUCTIONS/PRESENTATION
Add a large dollop of yogurt on your plate and spread it around
Place carrots (and zucchini) on top of the yogurt followed by fresh chopped mint or basil.
Finish with a sprinkling of DUKKAH on top of the vegetables with a drizzle of your favorite olive oil.

PICKLING PROCESS: Use a vegetable peeler to make carrot/zucchini/cucumber ribbons. Submerge veggie ribbons in a bowl with a mix of 1/2 apple cider vinegar and 1/2 water. Ready in one hour! Or, refrigerate overnight. I like adding pear ribbons. Tastes great. 🙂

FAST PICKLED CARROTS

You don’t have to roll your carrots and zucchini like I have done here. Alternate with carrot on the outside. Or place in jars randomly. These pickled veggies were placed in a large steel bowl marinating overnight and then placed in jars stored in the fridge for 1-2 weeks. You will use them up quickly. Hint: If you get peckish. Take a veggie roll from the jar and enjoy! Healthy snack!

Pickled Carrots 🥕 Is Good For Your Gut Health

PICKLED CARROTS offers vitamins, minerals, and antioxidants.They are low in calories and fat, making them a healthy snack option. The fermentation process involved in pickling carrots (added mustard seed, 1/2 water, 1/2 vinegar) creates beneficial bacteria that support gut health.Cooking carrots depletes nutrients. Consuming pickled carrots in moderation can aid in weight loss due to their high fiber content. Adding pickled carrots to your meals provides additional nutrients.

DUKKAH (duqqa) with hummus is enjoyed as a dip or sandwich spread. Add pickled veggies as a burger topper. Sprinkle the Dukkah directly on the burger, chicken or seafood.

Using DUKKAH on so many foods encourages healthy choices as we develop good eating habits for better living!

Sprinkle Dukkah On Top Of Your Saurkraut/Carrot Side Dish!!

Add pickled carrots to sauerkraut. It softens the tanginess of the SAURKRAUT and adds good flavour. I also shred a raw potato to the sauerkraut and heat it up all together with the pickled carrots.(my German relatives recipe). OPTIONAL: serve with pork chops or sausages. 1 PROTEIN/Fat (sausage/port chops) plus 2 VEGGIES (carrot and cabbage).

Low Carbohydrate !!

Carrots are Complex carbs and Keto friendly. Very low carbohydrates. Carbs A cup (128g) of chopped raw carrots has 12.3 grams of carbohydrates, with 3.6 grams of fiber and 6.1 grams of natural sugars. Carrots are sweet! Almonds are not nuts they are classed as a stone fruit. Cashews are a fruit of the Cashew trees. As olive is a fruit too. The nuts you choose should come from a tree not in the ground(peanut).

AWE NUTS! Tree Nuts?

All these nuts are 15-18 gm weight. Eating dukkah does not involve a lot of calories since it is sprinkled on food.