Roasted Sun Dried Tomatoes

I am a firm believer in the power of a roasted vegetable. Not only can virtually every vegetable be cooked in this way — no recipe required — but roasted vegetables are also universally pleasurable to eat. Have a picky eater in the house? Roasted sun dried tomatoes tantalize your taste buds. Roasted tomatoes on your pizza with feta and spinach is a treat! YUMMMM!

Air Fryer Wins!

I dehydrated my tomatoes in the oven and in the air fryer. The air fryer won out in clolor and in flavour. No oil added. I did add olive oil and garlic with herbs as I jarred my sun dried tomatoes. When I say sun dried it is definitely my artificial sun from the air fryer! Like many other cooking methods, air-frying triggers a chemical reaction — the Maillard effectTrusted Source — that improves the color and flavor of air-fried food.

Oven dried Roma tomatoes, and in “sur la table” air fryer. My air fryer looks like a toaster oven. I want to see inside. The air fryer resulted in brighter and tastier tomatoes. So pleasantly surprised! From this picture I let the tomatoes sit longer in the air fryer. They got smaller and crispier. But, stayed a bright red.

Follow the temperature and times suggested by your dehydrator. It may take up to 8 hours in the dehydrator – to dehydrate the tomatoes to the right consistency.

TIPS For Best Results

Use about 3 lbs of tomatoes (or more) It varies. Follow these instructions to get optimum results

  • Try sprinkling the tomatoes with other herbs that you may prefer, such as rosemary or thyme.
  • Be careful not to over-dry the tomatoes. They should still be somewhat pliable and have a chewy texture.
  • You might also consider adding a tablespoon of lemon juice or white wine vinegar to each jar prior to sealing them. The acid helps to preserve them even further.
  • To avoid spoilage for longer storage, don’t add garlic.
  • Sun-dried tomatoes should last a month or more when refrigerated.

I put my sun dried tomatoes on pizzas, sandwiches, burgers and salad. Feta cheese is a must in the salad and pizza. These two flavors really pop together.

There is a Tomato Land at Flavor Town!

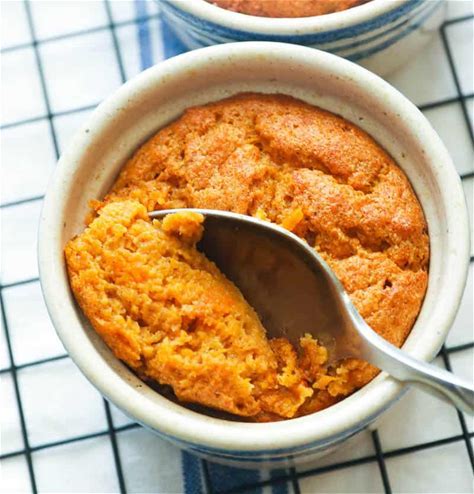
Sweet Potato Soufflé

This healthier version of the original version of sweet potato pie. No crust and no sugar. And it tastes wonderful! Friends and family still say,

..this is the best sweet potato soufflè I have ever had!

Long ago, I was invited to classmates dinner during a crisp autumn weekend. I decided to bring a sweet potato cassarole with marshmallows. This was the first time I made this thanksgiving classic. I watched mom make lanttulaatikko at Christmas and substituted sweet potatoes for the rutabaga. She did not use a recipe and we didn’t have internet in those days. As I arrived, the host did not know what I brought. Too much studying. However, it was all gone. I kept my wheelhouse of spices when I made the sweet potato soufflè . I have never added sugar or syrup to this dish because mom never did. Subsequently I did not add any sweetener. Frankly, I never understand the addition of extra sugar to this delicious soufflè . I knew from basic chemistry that oven baking turns the sweet potato even sweeter.

Recipe ❤️

Sweet Potato Soufflè - Mildly Spicy

  • Servings: 4-6
  • Difficulty: medium
  • Print

INGREDIENTS
5 tablespoon salted butter, plus more for soufflé dish(es)
Fine ground rye bread crumbs -enough to coat the baking dish(es)
3 1/2 tablespoons all-purpose flour
3/4 cup whole milk
1 1/2 cup mashed sweet potatoes
3-4 large eggs, separated, and at room temperature
1 teaspoon ground nutmeg
1 tsp cinnamon
1/2 tsp. chili pepper
1 tbsp. lemon zest (one lemon)
3-5 cardamon pods – ground (optional)
A pinch of turmeric (optional)
A pinch of cumin (optional)
1/4 tsp cream of tartar (for egg whites- stabilizer)
A pinch of salt (for egg whites)

DIRECTIONS

1. Preheat oven to 400 degrees.(Prep dish as oven is heating) Butter a 1-quart soufflé dish -or ramekins- and coat inside with butter, followed by fine bread crumbs, tilting and turning dish to coat sides completely.
Prepare Sweet Potato
2. Microwave sweet potatoes by puncturing with a fork in several places & wrapping in a moist paper towel set at high for 5 minutes. Check if done by poking with a fork. Flip the potatoes over and continue to microwave for another 2-3 minutes. minutes. The moist paper towel allows for fast peeling.
Purée Sweet Potatoes
3. Cool potatoes to room temperature, then transfer to a food processor or blender. First, purée fresh chilli peppers. Then add sweet potatoes. Purée until smooth, to yield 1 1/2 up to 2 cups.
4. In the microwave, heat milk (about 20-30 seconds) until hot, but not boiling. Place hot milk in the bowl of an electric mixer and slowly add sweet potato, butter and spices. Blend well. Taste to determine if you need more spice. Then, whisk 4 egg yolks and add to sweet potatoes. Blend well.
Egg Whites
5. Beat 4 egg whites with a pinch of salt + 1/4 tsp. cream of tartar in a very clean chilled bowl (copper bowl -if you have one) until stiff peaks start to form.
6. Fold egg whites into sweet potato mixture; pour into prepared soufflé dish(es). Flatten the top of the dish with a knife and use your finger to follow around the inside rim to create a rounded, high, even puff. Turn oven down to 375F. Bake for 25 to 30 minutes or until well puffed and browned on top. Serve immediately.

Egg Whites: Fix

The most crucial step in all soufflès are the egg whites. Whisk egg whites until foamy and just turning to a peak. Some chefs add cream of tartar ( in lieu of sugar or plus sugar) to prevent the egg whites from collapsing. Over whisking egg whites will result in dryness and breaking of the soufflè. If your souffle does not rise a lot do not worry. It will taste great. If you like this dish, you can achieve great heights the next time you make it! 🙂

Vegan Version

  • Olive oil instead of butter
  • Unsweetened vanilla almond milk instead of regular milk
  • Leave the skin on because it’s full of nutrients
  • Add a little bit of turmeric to balance blood sugar. [ you can not taste it in the pie]

Healthy Nutrition

Sweet Potatoes are known to be beneficial to individuals with type 2 diabetes due to the high levels of magnesium and fiber, which helps in reducing insulin resistance and stabilizes blood sugar.

Sweet potatoes have a large level of carbohydrates. But, they generally have a low glycemic index: of 61.

VARIATIONS

To the base: add grated ginger, garlic, apples, pineapple, cranberries, currents, cheese or white potato. Sprinkle cinnamon on top. Add au juice: hot cinnamon/apple/cranberry juice to the table.

<– This souffle is broken. As the famous Julia Child would say, “No one will know.

Orange Sweet Potato (most common), Red Jamaican (white inside) and Japanese Sweet Potato (All red)

Coffee Soufflé ☕ by Julia Child

You may guess I am a big fan of Julia Child. Julia Child’s coffee soufflé directions are standard and apply to the sweet potato soufflé . Good Baking Tips!

Butternut Squash: Roasted with Spicy Chick Peas

A HEALTHY DISH ! The complimentary spices and roasted veggies burst with flavour!

Ingredients

  • 1 small butternut squash (about 1 1/2 pounds)
  • 1/2 cup plain whole-milk Greek yogurt
  • 5 garlic cloves (1 finely grated, 4 chopped)
  • 2 tablespoons fresh lemon juice, divided
  • Kosher salt, freshly ground pepper
  • 4 tablespoons olive oil, divided, plus more for drizzling
  • 1 (15-ounce) can chickpeas, rinsed, patted dry
  • 1 medium onion, chopped
  • 2 tablespoons of curry powder/paste or vadouvan
  • 2 radishes, trimmed, very thinly sliced (optional)
  • 1 cup parsley, mint, and/or cilantro leaves8
  • 2 tablespoons pomegranate seeds (optional)
Roasted WHOLE Butternut Squash

Instructions

  1. Preheat oven to 425°F. Roast squash directly on oven rack until a paring knife poked through skin easily slides through flesh, 50–65 minutes. Let squash cool until you can handle. Trim ends, halve lengthwise, and scoop out seeds. Tear or cut squash into large pieces; discard skin (it will come off easily as you tear).
  2. Meanwhile, mix yogurt, grated garlic, and 1 Tbsp. lemon juice in a medium bowl; season with salt and pepper.
  3. Heat 2 Tbsp. oil in a large skillet, preferably cast iron, over medium-high. Cook chickpeas, shaking skillet often, until starting to brown and crisp, about 5 minutes. Add onion and chopped garlic and cook, stirring often, until onion is translucent, about 5 minutes. Sprinkle in vadouvan (curry powder) and cook, stirring, until chickpeas and onion are coated and mixture is fragrant, about 1 minute. Season with salt and pepper and transfer to a medium bowl. Wipe out skillet.
  4. Heat 2 Tbsp. oil in same skillet over medium-high. Cook squash pieces, cut side down, undisturbed, until browned and caramelized, about 5 minutes. Turn pieces over, remove from heat, and season with salt and pepper. Spoon chickpea mixture over squash, then dollop reserved lemon-garlic yogurt around.
  5. Optional: Toss radishes, herbs, and pomegranate seeds, with remaining 1 Tbsp. lemon juice in a small bowl; drizzle with a splash of oil and season with salt and pepper. Scatter over squash and chickpeas. Finish with a grind or two of pepper.
Roasted Spiced Chick Peas
(Optional) Pomegranate and Pistachio Nuts …you will be glad you added the pomegranate!
LEMON GARLIC YOGURT TOPPING: Can Be Served On The Side ( No Pomegranate here).

VARIATIONS

Add greens, kale ships, collard greens, swiss chard, etc. Cranberries are a good ubstitute for pomegranate. Add leftover quinoa or feta cheese cubes. Serve as a veggie tacos. ‘Squash’ Burgers (see below). Lightly mash squash to biuld your burger. If you have more people at the table, add spinach to the mix to extend your dish

VEGGIE BURGER: Curry / Squash/ Chick Peas/ Pomegranate/ Cilantro/ Parsley

GOOD EATS:

FOODIES ARE # 1!!!

ROAST VEGETABLES ~ TRENDING!

‘The BEST’ OVEN-Roasted VEGETABLES!

CHANGE THE WAY YOU ROAST VEGETABLES: For goodness sake! After making over 1,000 meals with roast veggies, I started experimenting and made some modifications. I knew I had a winner when I got huge compliments for  my ‘new’ roasted vegetables. It is still my all time favorite veggie recipe!  One reason is that it’s so easy to make! At a dinner party, one of my friends proclaimed  “These veggies are so good. I cant believe how good they taste!”  The potatoes are crispy,  yet soft and  fluffy on the inside.  The red peppers were especially a big hit.  I have been asked to share this recipe with you. I hope you enjoy it!


.
print_recipe
.
.

INGREDIENTS

1 medium potato* (any kind),  cut into 1  inch cubes
1 yam* peeled and cut into 1 inch cubes
1 carrot and/or parsnip peeled and sliced into 1 inch slices
6 brussels  sprouts
1/2 head garlic, cloves separated and skins removed
2 large shallots, peeled and quartered ( sweet or red onions  )
2  red and/or yellow bell peppers, cut lengthwise into 1  inch strips
1/2 cup Calamata olives, pitted
2-4 tablespoons olive oil ( more oil, the better )
2 sprigs of FRESH Rosemary or Thyme
3/4 teaspoon salt
3/4 teaspoon freshly ground black
* If you decide to leave the  skin on large tubers before roasting,  wash and scrub well. Soak in cleaning vinegar for at least 15 minutes before chopping.

INSTRUCTIONS

  1. Preheat oven to 450 F degrees(232 C ) and prepare vegetables.
  2. In a large bowl, toss potatoes, yams, carrots and brussels sprouts with  olive oil and salt.  Add to roasting pan and roast in the oven for 20 minutes

    Cubed Potatoes, Yams, Parsnips & Carrots

  3. Add garlic and shallots to  the pan  and toss with the other vegetables. Roast for 20 more minutes

    Garlic And Shallots

  4. Add chopped bell pepper and olives to the pan and sprinkle with black pepper.  Add 2 rosemary sprigs on top of the vegetables. Return to oven
  5. Cook for 20 minutes longer until vegetables are nicely browned but not charred. Because the peppers are only cooked in the last  20 minutes, they are still juicy, tender and tasty.  As all oven temperatures vary, please check the vegetables as they roast.

Fresh Rosemary

TIP:  Make sure you use FRESH ROSEMARY (or thyme – if you don’t have rosemary on hand ). Rosemary needs to be fresh, or not at all. When chopping vegetables err on the larger, chunky  side.  You can always  substitute/add your favourite veggies.  Keep in mind  THE 20 – 20- 20  MINUTE ‘Roasting’  Rule: The firmer vegetables go in first. Then, add the onions and garlic with the most tender vegetables in the final 20 minutes: mushrooms, green tomatoes,  peppers.

VARIATIONS
1.  I add baby turnips  if they look especially fresh and small at the market that day.  As you know, this recipe bakes in 3 BATCHES. The hard root vegetables are roasted first.

Turnips

2. The softer onions and garlic are next in the next 20 minute intervals.

3.  In the third and final stage,  the lighter,  succulent vegetables are added. Friends ask me how my roasted peppers stay so juicy and tasty?   They are only roasted for the last 20 minutes.  The peppers add such a great flavour  and sweetness to the mix.   Try the black olives. If you are not a fan, just  leave them as the flavour is very complementary to the mix. Please  try them before you pass judgement.

Oven Roasted Vegetables

The great aroma for these roasted vegetables comes from  the garlic and shallots along with the rosemary of course. HINT: Use up what you’ve got. Look in the fridge and pantry and roast it!


THE POWER OF ROOT VEGETABLES
The starchy root veggies will satisfy your sweet tooth. You not only feel fuller afterwards, weight loss benefits prevail.
From their high-fiber content to their many nutrients, root vegetables boast  a long history of medicinal and dietary uses.  These vegetables can be served cold as well.  They sell these cold  at those expensive gourmet shops.  Cooked and then cooled potatoes (as well as quinoa, barley and rice). All have resistant starch.  Resistant starch burns more slowly and helps you lose weight. They appear to help you burn fat up to  24 hours later. Why?  No one knows. But what is known is that once resistant starch gets to the colon, your body ferments it and produces an anticancer agent called butyrate – yet another health benefit.

Roast Winter Vegetables on the BBQ

Grilled Cauliflower -TRENDING

In Living Colour

Cauliflower Steak

What’s popular in Paris today is braised or grilled cauliflower. It started last summer (2018), when everyone was grilling ‘colourful’ cauliflower.  A cheerful and healthy choice. We are featuring purple cauliflower for the nutritional value.
Purple cauliflower has the same antioxidant: anthocyanin, which is also found in red cabbage and red wine. The trend towards gluten-free and dairy free helps support cauliflower. Food companies are capitalizing on the low-carb, gluten-free trend by using vegetables like cauliflower to replace flour, rice and other simple carbs. Mashed cauliflower (see recipe below) instead of mashed potatoes is a welcome change.

Slicing Cauliflower Steaks for the Grill

Spicy Herb Oil : Use this oil to baste your grilled cauliflower.
Add basil, parsley leaves, garlic, lemon zest, salt and oil to a food processor: emulsify.
Taste and adjust the seasoning if needed. It’s your basting oil, your taste buds. You never go wrong with fresh herbs. That’s the real secret.   Transfer the oil into a small jar or container. Make it hot (caliente) by adding  jalapeno and stir to combine. Baste the cauliflower with this oil mixture at the end of cooking.  Your Paleo  friends will applaud  your efforts.  Make enough grilled cauliflower to FREEZE and enjoy at a later date.

Colorful Grilled Cauliflower Trees -We Are Eating Healthy Today!

ADD FLAVOUR ‘when you kick it up a notch’: Click on -> Emeril Lagasse for his oil spice suggestions. Emeril  likes to add curry powder and/or cayenne pepper & garam masala to his basting oil  mixture instead of our  classic *basil, parsley and lemon mix*.  We are  all-embracing the healthy, exotic, eastern spices. Oven roasted instead of on the  grill works well for Emeril as he chooses flowerets for easy eating and coverage.  It’s all good, healthy and tasty!

Caliante (Hot) Basting Sauce  with ”Garam Masala’

BONUS recipe

CAULIFLOWER MASHED POTATOES
HEART SMART: This recipe  using ‘white’ cauliflower, cuts back on carbohydrates and starches in your diet  (part of the Paleo Diet Plan). . A healthy choice!  The big bonus is that some people can not tell the difference between your cauliflower mash and your traditional ‘starchy’ mashed potatoes  you have served for many years.

.

print_recipe
.
.

Ingredients:

• 1 large head cauliflower
• 5 large cloves garlic, peeled
• ¼ – ½ cup light sour cream
• 1-2 Tablespoons unpasteurized butter
• 1/4 Tsp, Nutmeg
• Sea salt and black pepper to taste

DIRECTIONS

  1. Fill a four-quart stockpot with 1-2 inches of water and allow it to come to a boil.
  2. While water heats, wash and trim cauliflower and cut up the florets and stem.
  3. Place cauliflower and garlic into the pot, lightly salting. Boil 10 minutes, or until everything is tender. Drain out the water and transfer the garlic and cauliflower into a bowl . Use an electric hand mixer (or use a hand masher) to create your ‘smashed’ cauliflour.
  4. Add in butter, sour cream, salt, pepper and nutmeg. Mix until smooth and serve hot.

FREEZER TIME: 10-12 MONTHS. Cooked cauliflower can not sit longer than 2 hours before freezing or refrigerating for another 3-5 days. Properly stored, freezer cauliflower  will maintain best quality for 10 to 12 months. But will remain safe beyond that time.

Cauliflower has several properties that may help with weight loss. First, it is low in calories with only 25 calories per cup, so you can eat a lot of it without gaining weight. … As a good source of fiber, cauliflower slows digestion and promotes feelings of fullness.